I've been busy the past week. I worked in stages, doing a little bit at a time so I didn't have enough done to post each time I finished. So I waited until I had a decent amount finished before I posted.
Here we go
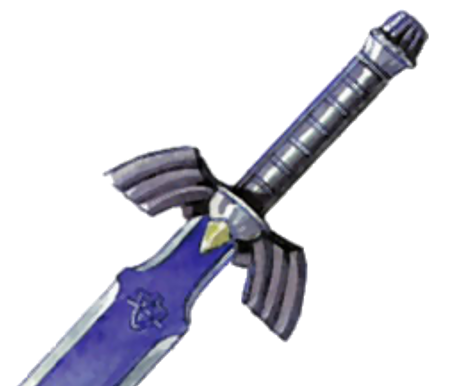
First I drew the Triforce symbol on the appropriate part of the blade.
Then I passed my crafting knife over the lines.
I used a pen...
and engraved the symbol on the blade.
Then I took the cardboard tube I cut out from the previous post and taped it in place.
Here is a close up picture of the actual hilt.
I did a lot of crumpling paper and taping to get all those little details on both sides. I didn't make that little gem thing in the middle yet.
After that I paper mached the entire sword.
 |
| Note: I use a lot of odd items for tool instead of my actual tools, I'm just too lazy to get up to get them ;P |
I used my favorite tool to put the paper mache into the engraved part of the sword.
I stuck some wire in handle for stability and stuffed newspaper to keep it in place. I left some extra wire sticking out for the pommel.
This is what the sword looks like at the moment.
While the paper mache was drying on the sword I started working on the shield.
Please don't ask me how I got the cardboard like this (I know quite a few of my friends would ask anyway), I did it a few years ago, I forgot.
I then taped on the back of my chair to get the correct curve. I haven't done it yet but I'm going to paper mache it so it retains the curve.
And thanks to the help of my best friend for suggestions and ideas for this next project. I'm not going to tell you what it is until its finished.